How I scored 97% in the CKAD exam - Certified Kubernetes Application Developer
I have been using Kubernetes since 2019 for personal use on GKE and using clusters at work. That was NOT enough to pass! I assumed that it would not take much effort to pass this exam. I was wrong. Whilst I had most of the knowledge I needed, I did not realise just how fast you need to be.

Disclaimer: I passed my exam in June 2021 on the Kubernetes 1.20 exam. By the time you read this, some of the commands or references below could be out of date. You should tailor this advice to what works for you. That said, much of this advice should be relatively timeless.
There are many of these types of posts on the internet. Everyone has different experiences so I figured my different perspective might be useful!
I have been using Kubernetes since 2019 for personal use on GKE and using clusters at work. That was not enough to pass! I assumed that it would not take much effort to pass this exam. I was wrong. Whilst I had most of the knowledge I needed, I did not realise just how fast you need to be. This is compounded by the fact you need to do everything purely through the CLI. If you're used to any krew or editor plugins, unlearn that workflow. Get used to using barebones Kubectl and a CLI editor. You have two hours to complete 19 practical questions.
It's also worth mentioning - I didn't pass this exam first time! I'm not exactly sure why, I thought I did OK, but I reckon the main reason was I wasn't switching to the default namespace when it doesn't mention a namespace. I also had an issue with the Docker Hub being rate limited that I didn't experience the second time. Either way, I passed with 97% on the second attempt a week later. I did do a few things differently and the following tips include those things!
Practice
This article isn't really about learning the concepts of Kubernetes. It's more focused on how to pass the exam. I mainly learnt Kubernetes through practice at work and for personal projects.
That said, I used Mumshad's course. The most useful part of this for me was the labs. The great thing about these labs are that they are similar to the experience in the exam. You get a terminal to an ubuntu node with kubectl configured. You have to configure your setup in a similar way to how you would have to in the exam. I highly reccomend pretending you ARE in the exam every single time you do a lab. You don't want to be wasting time setting things up.
- Do Mumshad's labs
- Do these CKAD exercises on GitHub at least once if not more.
- Do the killer.sh practice exam. Do this at the end once you are confident you are fast. It's not free, but it's the closest thing to the real exam you'll get.
Do these. Do them again. To get fast, you need to practice. It gets tedious, but practice will make you faster.
Configuration
Set up your configuration every time you do practice labs or do any learning (apart from the OS setup which you should do once). You can use this configuration section as a checklist. It's in a rough order too. You should aim to get all of this configured in 2-3 minutes. You don't want to be wasting precious time at the start so practice makes perfect.
This section is my opinion, so feel free to modify as you see fit.
OS
Set up a CKAD chromium profile that is not logged into anything. Do not use this for anything other than accessing kubernetes.io and the exam.
Set up bookmarks. I used these ones on GitHub: reetasingh/CKAD-Bookmarks. Make sure whatever bookmarks you use that they are up to date and you know how to use them. You can import a bookmarks HTML file at chrome://settings/importData.
Set up search engine to search the docs at kubernetes.io/search/?q=%s and your bookmarks at chrome://bookmarks?q=%s
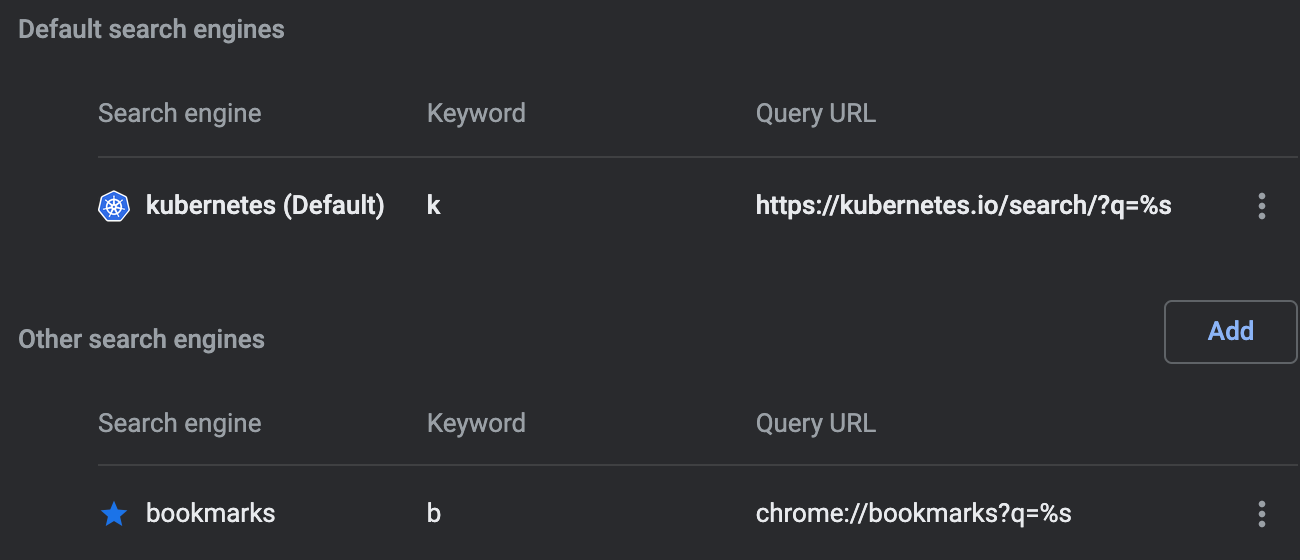
Remove other search engines so you don't accidentally search for something else.
I like to set my key repeat to maximum which helps in VIM or navigating the terminal.
In the real exam, close all other programs other than chromium. Reduce CPU, memory and network usage by also killing any hungry background processes (e.g. backup tools like Dropbox).
Set up two windows. It says two tabs in the guidance but I used two windows just fine. I use the left two thirds of the screen for the exam window and the right third for kubernetes.io.
Hide any unnecessary OS UIs such as taskbars etc.
I also highly recommend using a large high resolution external monitor for the exam. Laptops must be closed during the exam when using an external display. With my first attempt, I had an issue with the proctor not liking the laptop being on my desk for some reason but they accepted it in the end and it was not an issue the second time. Must have been a misunderstanding.
My setup looked something like this. We'll get onto the terminal setup in the configuration section below!
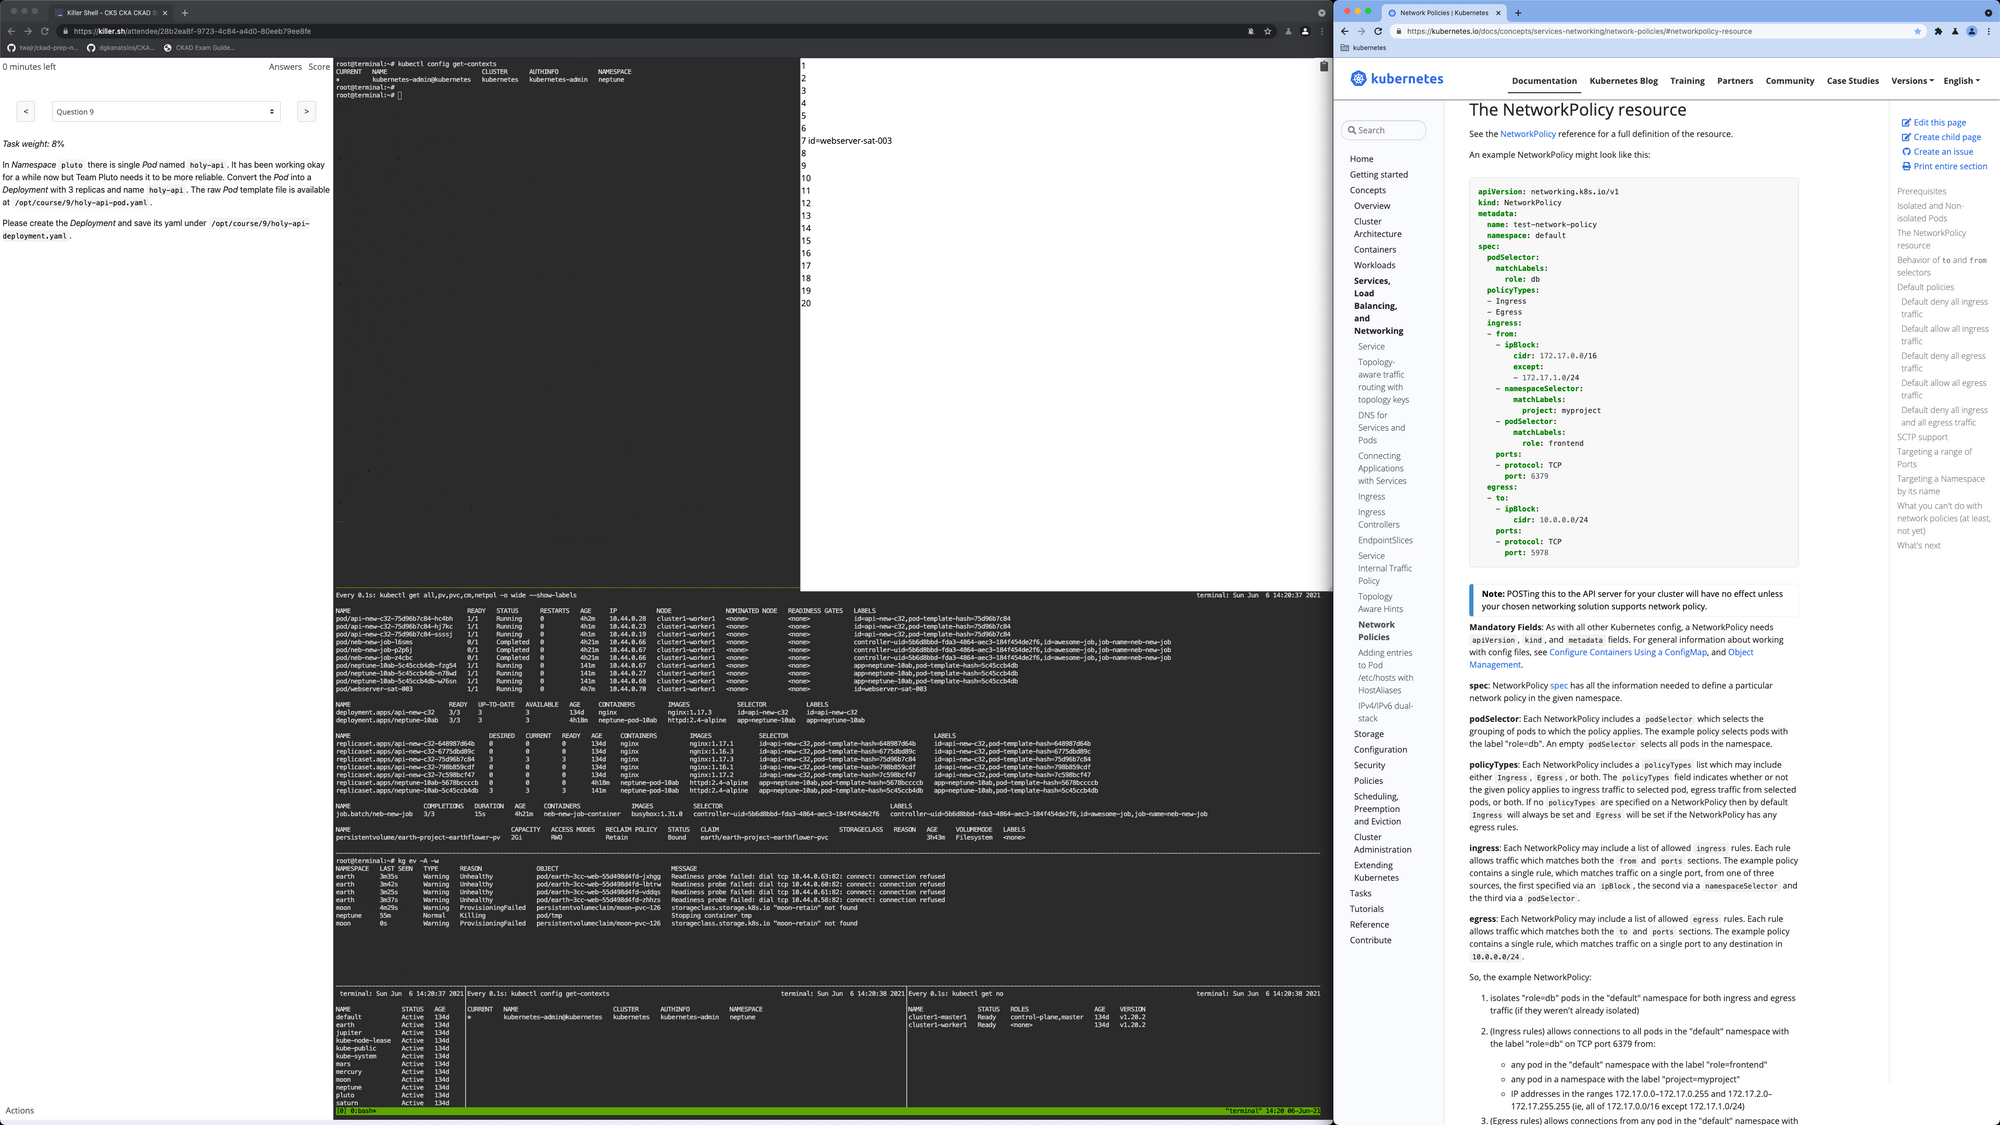
With this setup, the questions will be along the left edge of the monitor. Your working terminal will be roughly in the middle. Your notepad will be in the top right corner of the terminal (when open). There are commands for the exam in the top of the window.
Note: the exam window in the screenshot is a mock (killer.sh) rather than the real exam but the real one is similar. I highly recommend buying the mock for practice. The mock exam window is using a different chromium profile to keep the blue CKAD profile pure from external links.
Become root
In Mumshad's mocks, you may already be root. In the real exam and on killer.sh, you start off with a non-root user.
I prefer to become root at the start of the exam. This is probably more useful for CKA than CKAD, but worth doing just incase.
Before you begin, take note of non-root user and their home directory.
$ pwd
/home/k8sThen become the root user.
$ sudo -iYour working directory (pwd) will now be /root.
You may not have a .kube in /root so you can copy that from the non-root user. .kube is needed for context configuration which is needed in the exam for switching between clusters or namespaces.
cp -r /home/k8s/.kube /rootVim
Vim and Nano are pre-installed, but I use Vim. Vim is not required but highly recommended. I have been using Vim for around 6 years so it was the obvious choice. There is a bit of a steep learning curve with Vim. If you want to use it, make sure you know how to do enough to edit yaml files. If not, get comfortable with Nano.
I configure it with the following in ~/.vimrc
set et ai ci nu sw=2 ts=2 sts=2It is worth understanding what these mean so that you can memorise it better.
I also use the paste option when I need to paste from the Kube docs. However, it tends to mess with whitespace, so you should turn it off when not needed. When pasting from the Kube docs, run :set paste. When done, I quit and reload vim to reload the settings from .vimrc. You can also run :set nopaste
Bash
There may be an existing ~/.bashrc for the root user. If not, copy it from the non-root user's home directory like with .kube. I define some additional aliases and variables for usage throughout the exam.
I will reference these aliases throughout the rest of this article.
At the end of ~/.bashrc I define the basic k alias. Some people like to enable kubectl bash autocompletion using this command but I found that the latency to the exam server was high so I'm faster by not using it.
alias k="kubectl"then I type and copy the following line to paste it 5 or 6 times to avoid some typing.
alias k="k "I additionally set the following aliases. I consider these the bare essential commands you will need.
alias kg="k get"
alias kd="k describe"
alias kr="k run"
alias kcr="k create"
alias ka="k apply -f"
alias krm="k delete"Other commands you may find useful are explain and edit, but I did not use them. Add any other shortcut aliases you find you need.
This is a useful alias for modifying the currently selected context to change the namespace.
# usage: kn <namespace>
alias kn="k config set-context --current --namespace"
I also export a variable which can be used to generate YAML with the kcr and kr aliases without having to type it out fully which can be error prone.
export dry="--dry-run=client -o yaml"Tmux
Tmux is optional, but highly recommended. Tmux stands for "terminal multiplexer". Another terminal multiplexer is GNU screen, but I use tmux.
Essentially it means you can have multiple terminals in one. It's not like on your desktop where you can use a GUI application which can spin up new terminals. You only have one terminal in the exam so tmux is useful.
If you use one, make sure you know how to use it enough that you don't get slowed down during the exam having to configure it.
I tend to use iTerm2 on MacOS normally and normally just ssh to servers in multiple iterm2 panes. So I learnt tmux specifically for the exam as that no longer applies.
Here's a list of things I learnt which was enough for the exam.
- Learn ctrl+b for running commands in tmux.
- ctrlb+" for splitting the active pane horizontally
- ctrlb+% for splitting the active pane vertically
- ctrlb+ arrow keys for moving the active terminal
- The behaviour of mouse mode
I set the following in ~/.tmux.conf to enable mouse mode
set -g mouse onThis is recommended if you do not want to learn as many keybinds. You can click into other panes and adjust their size by dragging
You can also set this at runtime by switching to command mode with ctrl-b+: then running `set -g mouse on`. It can also be turned off at runtime with `set -g mouse off`.
One thing to bare in mind with mouse mode is sometimes you accidentally select text. To get out of this mode you just need to press ctrl+c.
Configure tmux panes
I would suggest doing the exam on a large, high resolution monitor so that you can see all of the resources on the screen and still have a working terminal.
You should absolutely configure the tmux panes how you want. These are just a few tips that helped me.
I keep my main operating terminal at the top at full width or split into two. You could split it into two so that the notepad in the top right goes over the rightmost terminal rather than the main one on the left. I would use the top terminal for running all the commands to generate YAML, running ad-hoc commands, and editing files in VIM.
Run this command in a tmux pane to have an updating view of the current namespace. You'll want a full width pane for this command.
watch -n0 kubectl get all,secret,cm,netpol,pvc -o wide --show-labelsThe resources listed should cover most of the namespace-scoped resources that you will need. Note: kubectl get all does not list all resources. If you're interested in the detail, check out this issue. Pods, deployments, jobs, cronjobs are included in all so do not need to be specified.
watch -n0 runs the command again 0.1 seconds after completion of the previous run, as 0.1 seconds is the minimum time supported.
Nodes, namespaces, and persistent volumes are cluster-scoped resources. These are worth seeing but I put them in a row of panes at the bottom because they don't change that much. They will change when you switch contexts with the kubectl config set-context command in the question. There should be four contexts. Most of the time you're using the first cluster but there are questions that use the others too so these commands are worth using watch with.
The -o wide and --show-labelsoptions are optional.
watch -n0 kubectl get ns --show-labelswatch -n0 kubectl get no --show-labelswatch -n0 kubectl get pv --show-labelsIt could also be worth listing the contexts in another pane. This will display all of the available contexts that you can switch to using the command shown at the start of each question. It is worth noting the kn alias will modify the namespace in the currently selected context. This command will show the selected context with an asterisk * in the first column. You can use this pane as a reminder to switch clusters and namespaces or risk getting zero for the question!
watch -n0 kubectl config get-contextsI also have a full width row for streaming events on the cluster. I don't use watch for this as kubectl streaming them with `-w` is more useful. This is useful to glance at for most questions when you are applying resources. You can see the errors or success of your new pods without having to run any commands manually. Additionally, it can also hint at the future questions if there are errors that keep appearing!
kubectl get ev -A -wNotepad
You can actually do this step before you click "Begin exam" which saves a little bit of time. Open the notepad in the top right. Create a line for each question number so that you do not have to do it during the questions.
Editing YAML
Generate YAML where you can. Edit it from there. When happy that the resource is ready to be applied, run ka. Before running ka, double check you are in the correct namespace as defined in the question. Use default if it is not otherwise specified.
Generate your yaml with the $dry variable you set in the ~/.bashrc (from the configuration section of this article). These options are generally supported on any command which creates or updates Kubernetes resources. You will use it most with run or create, but may wish to use it for expose or apply.
When generating yaml, use the -n option to set the namespace. If you're using kn to switch namespaces, this is not strictly needed. However, having it defined in the YAML will ensure that it will apply to the right namespace without relying on you remembering to switch.
Generating pod YAML would look something like this.
kr $dry web --image=nginx:alpineGenerating YAML from an existing resource
kg po web -o yamlGenerating a deployment YAML might look something like this.
kcr $dry deploy web --image=nginx:alpine --replicas=3Generating a service YAML from a deployment
k expose $dry deploy web --port=8080 --target-port=80Always generate resources like this because kubectl will prefill things like names and labels to decent defaults. It will set up pod selectors to target the pods correctly. One thing you must note with both the pod and deployment generation is that the container name is the value of the resource name. The question may specify that the container name is a different value so you must edit the YAML from there.
There are also a few CLI tricks that are worth learning for managing your YAML files.
Firstly, I recommend naming your files <question number>-<resource>.yaml which is faster than using directories.
It is also worth learning the short versions of common resources which you can view with kubectl api-resources.
Then learn the following tricks which are useful in different situations
Pipe your YAML into tee.
kr $dry web --image=nginx:alpine | tee 01-po.yamlThis will output the YAML to your terminal and also to the specified file. Use this if generating the file for the first time and you are confident that you will not need to make any further edits, but you just want to check it.
Pipe your YAML into a Vim buffer.
kr $dry web --image=nginx:alpine | vim -This will open the YAML in Vim which you can then save e.g. :w 01-po.yaml. You can then modify the YAML to add additional resources that you can't add using kubectl arguments or flags.
You can also just direct it to a file if you're 100% sure you know what you're generating.
kr $dry web --image=nginx:alpine > 01-po.yamlYou should learn what you can and can't generate with kubectl. If you know this upfront, you can decide whether to use tee or whether to use a vim buffer to edit the YAML further. Use --help if you have forgotten usage.
Some things you can't generate from kubectl. However, you should never need to manually type out a resource completely from scratch. You either need to paste from the docs or get it from a given file or existing resource. Then you'll need to know how to edit them from there.
These are some of the resources that you can't generate:
- Network policies
- Persistent volumes
- Persistent volume claims
These are some common things I find myself manually defining in YAML either through copy and pasting YAML or typing out from memory. I won't go into detail about explanations. As I said at the start, this article is not so much about content, more about exam technique.
- readinessProbe and livenessProbe on container. httpGet, command, and tcpSocket. periodSeconds, initialDelaySeconds.
- Resource limits and requests on container
- Volumes in pod spec and volumeMounts in container
- Persistent volumes and persistent volume claim resources
- Multi-container pods
- initContainers
- container ports
- serviceAccountName
- securityContext and capabilities for a container. You need
Make sure you have bookmarked links to relevant YAML and that you know how to find them. You can alternatively use kubectl explain but I personally don't find it easy to use. You do not have a lot of time to be looking things up so make sure you know exactly what you are looking for and where it is. You also can treat the list as a checklist of what to learn.
Another thing that has tripped me up when practicing is defining fields twice. e.g. I defined pod resources at the top of the pod spec but it was generated with resources: {} at the bottom which would override the first one.
General Exam Tips
Get good sleep.
Eat well the day before
Get hydrated at least 2 hours before, then stop drinking until towards the end of the exam. You can also ask the proctor to go to the bathroom once you have done the security checks but before the exam starts.
VERY IMPORTANT is to make sure you are in the right namespace or you will get ZERO marks for the question. I reckon this is one reason why I did not pass in my first attempt. If it does not specify the namespace, use the default namespace.
If the question asks you to move a resource around (e.g. to a new namespace) , make sure you have deleted the old version.
Take notes by clicking the notes in the top right. Note down anything useful such as problem questions, high percentage questions, low percentage questions, etc. You can set up the notes before clicking "Begin exam".
Use ctrl-r to search through ~/.bash_history of previous commands to edit and re-run.
Copy and paste the names of things. Names are highlighted in the question which can be left clicked to copy. Typos are an easy mistake to make so could be an easy way to lose marks.
Check your solutions (time permitting). If you have time, try to check straight after implementing when the context is still in your head. Try to check questions again at the end - you may spot things you miss. Use the notes to guide checking importance.
Checking
If you don't have much time, you will have to be strategic with your checking. Here are some quick checks that you should hopefully be able to do for most questions.
- Verify you have deployed in the right namespace, or default if not specified.
- If an object needs to be applied, verify the properties of the deployed object with the question.
- If a file needs to be copied to a specific path, verify the file exists and has the properties in the question
- Verify the names of resources, containers, labels etc. e.g. The deployment name may be different from the pod name which may be different from the container name(s) etc. svc and netpol podSelectors target pod labels not deployment labels.
Beyond that, there are checks that take a bit longer but can be worth doing if you have time and the questions are worth a lot of marks.
Getting a shell into a container is useful for verifying state of a container. It must have a shell installed such as sh or bash but that should be the case during the exam. Not necessarily so true for more secure production applications built on scratch images or otherwise!
k exec <pod name> -c <container name> -it -- shFrom there, you can use any tooling installed in the image such as env, wget, nc, curl etc.
Checking Networking
A lot of this stuff is probably covered better in the docs, but here's my 2 cents on what you need for the exam.
Learn how to use curl, wget, and netcat (nc).
Learn that busybox images have nc and wget but NOT curl.
Learn that nginx:alpine images have all three tools.
Learn that nc can be used for direct TCP connections for non-HTTP services.
Learn how to specify the timeouts. I use 2 seconds. If you forget, you can use the help options.
- wget:
-T 2 - curl:
--connect-timeout 2 - nc:
-w 2
The timeouts ensures the process will exit if you can not establish a connection.
Understand that these tools will first lookup the IP by DNS if a hostname (e.g. service or public host) is specified rather than an IP. If a network policy is applied, it must also allow UDP egress on port 53 to allow DNS lookups.
If a connection can not be established the process with exit with a non-zero exit code.
Using wget to make a HTTP request and output the response to stdout with -O- rather than the default disk.
wget -O- -T 2 <target host>wget to output the HTTP response to stdout with -O-Using curl to make a HTTP request
curl --connect-timeout 2 <target host>curl to make a HTTP requestUsing nc to establish a connection to a TCP socket
nc -w 2 <target destination> <target port>nc to establish a connection to a TCP socketTesting egress network policy being applied to a specific pod
Get the internal IP of a ready TARGET pod from kg po -o wide OR the service name + service port which selects the pod which will resolve by DNS to a ready pod's internal IP.
Get the name of the source pod with labels selected by the podSelector of the network policy.
kg po -l app=webGet a shell into the existing source pod.
k exec <pod name> -it -- shFrom there you can run nc, wget or curl to make connections to test if a netpol is being applied as directed.
Specify the timeouts or use CTRL-C after waiting.
Test a service
Temporary pods can be used for testing that a service is configured with the correct target port and pod selector labels.
kr tmp --rm --restart=Never -i --image=nginx:alpine -- <command>kr tmp --rm --restart=Never -i --image=busybox -- curl --connect-timeout 2 <svc name>:<svc port>curl in a temporary pod to connect to a servicekr tmp --rm --restart=Never -i --image=nginx:alpine -- wget -O- -T 2 <svc name>:<svc port>wget in a temporary pod to connect to a service
If a connection can not be established the process with exit with a non-zero exit code and <ns>/<podname> terminated (error) will be output.
Testing a network policy being applied to a specific set of pod labels
It is easier to exec into an existing pod than run your test in one line. However, if there is no existing pod, you may wish to run your netpol test from a temporary pod. You would need to ensure the labels from the netpol podSelector are set on the pod using --labels.
spec:
  podSelector:
    matchLabels:
      key1: val1
key2: val2kr tmp --labels=key1=val1,key2=val2 --rm --restart=Never -i --image=busybox -- <command>If a connection can not be established the process with exit with a non-zero exit code and pod <ns>/<podname> terminated (error) will be output.
Conclusion
If you practice with the resources and learn some of these techniques you should have a good chance at passing the exam. Some of these tips are my personal preference so do not follow this exactly. It will be you taking the exam after all, so make sure you are doing what works for you!
If there are any major issues with my suggestions feel free to reach out. If it's just a change from a kubectl update I will probably not update the post, but will otherwise.
Thanks for reading and good luck!